Website Management
Maintaining Your Website
After you've built your website or blog, the job is not done. Go on your website from your browser periodically to make sure it still looks great and is running properly. There are other tools you should utilize to help maintain your website and monitor your traffic too.
In addition, you'll also need to use Google Webmasters to join the Google Adsense program and run their money-earning ads on your website. These tools are all online so as long as you have a computer, browser and internet, then you're set.
Remove dead links
QA your website regularly and remove bad content or links. Links that you've originally linked to in your content when you first published your website may become dead links some time later. Dead links on your website can negatively affect your search engine rankings and your site's credibility. It takes time and money to build and maintain a website so the links that were live before wouldn't work anymore if someone forgets to pay their own domain or hosting fees, or just decides to forfeit it all together. As mentioned, these dead links on your website does affect your search rankings so remove them as soon as you find them and then 'publish' the changes. Proofread and QA again and again.
Update & Add Content
Continuously add to your website with new content by creating a new blog entry or edit any existing wrong information (like if your hours of operations changed). Information that were accurate last year may not be accurate this year. Rules and information change year after year and as website and blog site owners, we're responsible with representing the right information or it could go awry.
Domain & Hosting Renewal
Don't forget to renew and pay your domain and hosting fees when they are getting close to renewal. These domain and hosting companies do a really good job of reminding you via email so remember to check your emails and that they are not located in your spam folders. If you don't renew them in time, your website will be down and no one would be able to see anything on your website. There is also a chance that you will lose your unique domain if you pass the grace period after the expiration date.
Reporting Tools
A lot of Content Management Systems have their own analytics and reporting systems but even today, it seems that it's also quintessential to still utilize Google Analytics to see your traffic reports. To sign up for Google Analytics, you can use your gmail account log-in, if you already have one, and go to: https://google.com/analytics and click 'sign up'. You'll create an account and then a profile, then you'll see a Google Analytics code generated. You'll need to add this very specific code to your website for tracking. Learn more about Google Analytics by reading the Weebly Google Analytics Guide.
The great thing about Google and their products is that you can use one Google or gmail log-in for all of their amazing tools for your website which include: Analytics, Adsense and Webmasters.
Regularly check on your Analytics reports to see if there are any alarming bounce offs from certain pages or whether your traffic has gone up or down. Sometimes you can find the answers to the growth and decline of the traffic of your website by just looking at these reports. They're great for solving issues. For instance, if you see that there is a high bounce rate for a certain page on your website, go to that page on your browser and see if there is anything on there that may not be helpful to your visitor. Maybe there is a dead link!
Note: my links to resources and recommendations may allow me to earn a commission from each sale.
Webmaster Tools
If you had looked under my Affiliate Ads page, I recommended integrating Google Adsense to monetize your website right away. However, in order to use Google Adsense, there are a few things you'll need to do.
Google Webmasters & Adsense
After you've published your website, you'll need to sign up for Google Webmasters: https://www.google.com/webmasters and add your domain there. Verify it with a code via DNS and then (after some time for Google to verify), you'll sign up for Google Adsense (using same account log-in): https://www.google.com/adsense. Under Adsense is where you'll be able to copy and paste the ad codes required to add ads to your website. Google has a lot of tutorials you can find if you get lost along the way. They are thorough and I've used them many times.
Importantly, when you've added your website domain to Google Webmasters, then you have submitted your website for indexing in the Google search engine. It is also crucial that you submit your sitemap on there as soon as your website is complete with all of the pages. It may take a bit of time for it to show up in searches but it'll be there, if you've done it correctly.
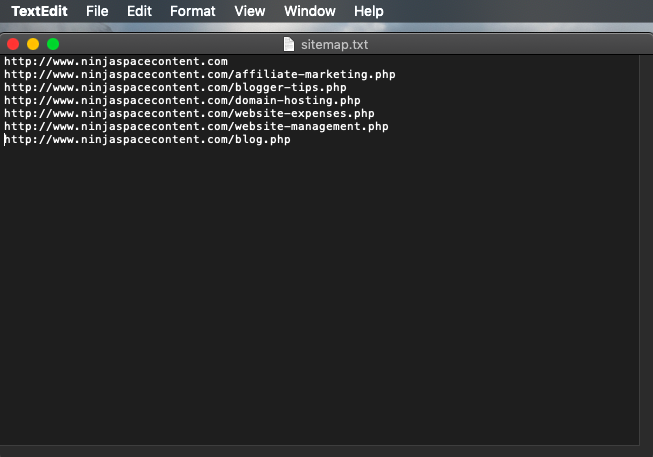
To show you how I created my sitemap, I used TextEdit that's already on my MAC computer and added each page URL line-by-line. (See the screenshot below for the sitemap of NinjaSpaceContent.com.)

After you have created your sitemap file, save it to your computer. Then, upload your sitemap.txt file to the directory of your website and hit 'publish' or 'update' (whichever click that will get you to update your website on your system and get that change live). Finally, you'll submit the website's sitemap link to Google Webmasters for indexing.
Don't forget to submit to other search engines too, like Bing at https://www.bing.com/webmaster.
